


Weekly Roundup 3 October
Happy Friday everyone! What another big week we’ve had – so much work behind the scenes, orders going out – love how busy it all is!
You may have noticed that there is a new button on our home page featuring all upcoming markets! Click here to view where we’ll be the next few months. The list is constantly changing so make sure to check back often! This weekend we’ll be at the Little Big Markets over in The Mount – though due to weather this may be postponed till Sunday. To find out more be sure to go to their Facebook page.
Also with a new month comes a new free desktop and iphone wallpaper designed by us for you. Click here to download the latest wallpaper featuring our new design ‘be brave’. This design is featured in our 2015 calendars and is available as an A3 gold foil print.
Lastly our ‘Ultimate NZ Giveaway‘ is due to close in just 2 days! With over 1300 entries, be sure to check it out and you may be in to win this amazing prize!
Hope you all have a great weekend and that lovely weather we had at the beginning of the week comes back soon…!
Scotch® Expressions Tape Garland
Looking for an easy way of decorating for an upcoming party or sprucing up a bedroom? This Scotch® Expressions Tape garland takes just minutes to make and is a great low budget option.


TOOLS NEEDED:
1 piece of card paper
1 pair scissors
Scotch® Expressions Tapes of your choice
2” scallop punch
2” ribbon stitch punch
bundle of twine
* If you don’t own punches you can do this with a craft knife.
HOW TO:
- Cover piece of card with your selected tape. Simply put tape along the sheet with no gaps in between the different rows, feel free to use different designs. If garland will be visible from both sides (not tacked onto a wall) be sure to cover both sides of the sheet.
- Fold over any excess from the edges to ensure it won’t be stuck in your punch.
- Punch out as many shapes as you can from you sheet.
- Use stitch punch in the middle of each shape for twine.
- Thread the twine through your shapes. To avoid fraying simply use a piece of your tape to cover the edge – this will help with the fraying and make threading easier.
- Display!
Easy peasy garland for any occasion!
This post is sponsored by Scotch® Expressions Tape.
Get Creative with Scotch® Expressions Tape & be in to WIN a shopping spree each week!
DIY wooden box
 Happy Monday everyone! I hope you had a lovely weekend full of Valentine’s Day festivities and relaxation. We were busy with weeding, gardening, sun basking, eating, laundering, working, organising – a very productive weekend indeed!
Today’s blog post is all about how to create this great ‘hold anything and everything’ box. For step by step instructions and what materials to you need click here and follow Whimsey Box’s instructions. This box has so many great uses, holding stationery on your desk, storing herbs on your kitchen bench-top, keeping all those small makeup containers tidy in the bathroom, the list goes on and on!
Enjoy!
How to Gift Wrap with Toodles Noodles
If you are like me, my gift wrapping skills are not that great, I usually settle for a nice bag to put my presents in. Lucky for us the talented Liora, who designs and makes her own gift wrap, shares her amazing gift wrapping skills with us. Just follow along step by step below.

(Post written by Amber at Elite16, photos by Michelle at Studio:Weir)
Gift Wrapping 101:
- Pick out your paper. Liora used her confetti, follow the arrow and New Zealand floral paper for this DIY.
- A pair of scissors
- Gift tags
- Tape
- Ribbon or twine
- Imagination and patience and maybe some music for inspiration

Confetti paper tutorial


To make this package stand out Liora created an extra fold on top. A perfect place to put your gift tag.


The finished product. Add your ribbon and a gift tag and you have a package almost too pretty to open!
With her New Zealand flora paper tutorial, Liora added a pop of color, by adding a red piece of fabric on top of the paper.

New Zealand flora tutorial: see the steps below on how to make your gift stand out


just add a fun gift tag with some ribbon or twine and show off your gift wrapping skills
Follow the Arrow: This tutorial is my favorite.
I am a big fan of this playful pattern and check out the whole gift wrap kit here. Those fun arrows on top are cupcake toppers.


Use an extra strip of paper to create a place holder for your gift tags and adornments


Add your cupcake toppers by creating a notch in the paper for showing them off

You may not want to open up these packages. They just look too good!
Now you should be a gift wrapping expert. With some fun paper, some cool accessories and a bit of imagination you can create packages that really stand out.
A big thanks to Liora for sharing her wrapping skills. If you love her paper she also has lots of other goodies in her shop: tote bags, tea towels, note cards and more. She also has a fun blog.

Your finished product. Now you are an official expert gift wrapper. Show them off!
DIY Bunting
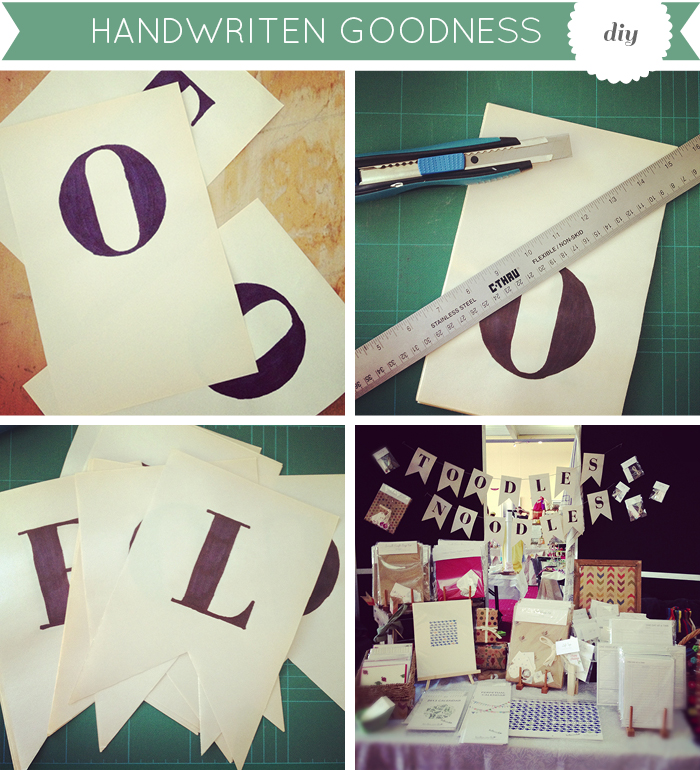
Last week I decided to make myself a bit of signage for my markets with some DIY handwritten bunting! I had seen some lovely “Thanksgiving” bunting written on old book pages and came up with the idea. Signage for markets can always be tricky as all tables are different sizes, spaces around them can vary, and you don’t want to take away from your display. So I thought bunting for making myself something that could be versatile in both size and display.
Here are the easy steps to create your own bunting! It makes a great accessory for the holiday season, birthday parties or maybe even your own market stall!
- Find what you’re going to write on (I used Newsprint – found at most art stores)
- Pick a typeface you like for your word.
- Make sure you print at a size that will work well for the end piece of your paper (and to print all letters needed!)
- Find a bright window to use as a light box and start tracing!
- Measure the center of the page and then draw with pencil two diagonal lines to the bottom corners
- With a sharp box cutter and metal ruler, follow the pencil line.
- Adhere your new beautiful flags to ribbon of choice! (I used hemp twine and stuck them on with washi tape)
Enjoy! x




Leave A Comment